
In today’s complex digital landscape, effectively tracking and analyzing campaign performance is paramount. Leveraging the right tools can significantly enhance your ability to understand user behavior, optimize conversions, and ultimately drive successful campaigns. Google Tag Manager (GTM) emerges as a powerful solution, empowering marketers to manage and deploy marketing tags without delving into complex code. This comprehensive guide explores the strategic application of Google Tag Manager in digital campaigns, providing actionable insights to streamline your workflow and maximize your return on investment (ROI). We’ll cover fundamental concepts, practical implementation strategies, and advanced techniques to leverage the full potential of GTM for campaign tracking and analysis.
From website analytics to conversion tracking and remarketing, Google Tag Manager offers a robust platform to consolidate your tagging efforts. This simplifies the process of integrating various marketing and analytics tags, including Google Analytics, Google Ads conversion tracking, and third-party tags. Whether you’re running search engine optimization (SEO) campaigns, paid advertising initiatives, or social media marketing strategies, GTM provides the flexibility and control needed to gather valuable data and gain a comprehensive understanding of your digital campaigns. This article serves as your gateway to mastering Google Tag Manager for effective campaign management, enabling you to make data-driven decisions and optimize your campaigns for optimal performance.
What Is Google Tag Manager?
Google Tag Manager (GTM) is a free tag management system that allows you to quickly and easily update measurement codes and related code fragments collectively known as tags on your website or mobile app. This includes tags from Google products like Google Ads and Google Analytics, as well as tags from third-party vendors.
Instead of manually editing site code, GTM uses a web-based interface to manage and deploy tags. This simplifies the process and reduces the risk of errors.
Key benefits of using GTM include:
- Simplified tag management: Update and deploy tags without editing site code.
- Improved website performance: Asynchronously loaded tags minimize impact on page load times.
- Version control and workspaces: Test and debug changes before publishing them live.
- User permissions and access controls: Manage who can access and modify your tag configurations.
Installing GTM on Your Website
Adding Google Tag Manager (GTM) to your website is a straightforward process, primarily involving the insertion of two code snippets provided within your GTM account. These snippets should be placed strategically within your website’s HTML.
The first snippet, often referred to as the container snippet, should be placed immediately after the opening <head> tag. This snippet loads the GTM container and enables communication with Google’s servers.
The second snippet, the <noscript> tag, is a fallback for visitors who have JavaScript disabled in their browsers. This snippet should be placed immediately after the opening <body> tag and provides a basic level of functionality in the absence of JavaScript.
While the process is generally simple, it’s crucial to ensure correct placement of both snippets to ensure proper GTM functionality. Consult your website platform’s documentation for specific instructions if needed. Once installed, you can begin configuring tags, triggers, and variables within the GTM interface.
Setting Up Triggers and Tags
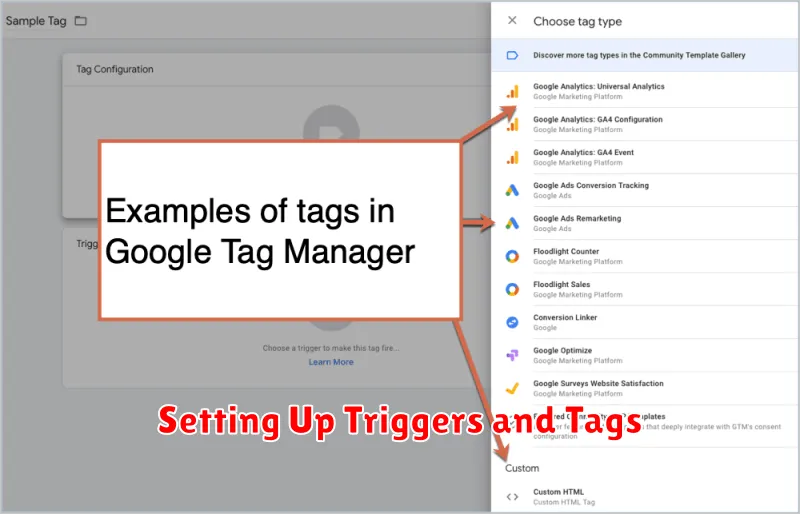
Triggers and tags are the core components of Google Tag Manager. Triggers define when a tag should fire, while tags define what action should be taken.
Triggers listen for specific events on your website, such as a page view, a link click, a form submission, or even custom events you define. You can configure triggers based on a variety of criteria to ensure tags fire only under the desired conditions. For example, you might set a trigger to fire only when a user clicks a specific button or visits a certain page.
Tags are snippets of code that execute actions on your website. Common examples include tracking pixel fires for analytics platforms, conversion tracking code for advertising platforms, and custom HTML/JavaScript snippets for various purposes. The tag’s functionality is determined by the platform or service it’s associated with.
The relationship between triggers and tags is crucial: a tag without a trigger will never fire, and a trigger without a tag has no action associated with it. Properly configuring this relationship is essential for accurate data collection and effective campaign management.
Tracking Events and Conversions
Event tracking in Google Tag Manager (GTM) allows you to monitor specific user interactions on your website beyond standard pageviews. These interactions could include button clicks, form submissions, video plays, and file downloads. By tracking these events, you gain valuable insights into user behavior and campaign performance.
Conversion tracking, a crucial aspect of any digital campaign, focuses on measuring the completion of valuable actions. These actions, often referred to as conversions, align with your campaign goals. Examples include purchases, sign-ups, or contact form submissions. GTM simplifies conversion tracking by enabling you to set up tags that fire when specific events representing conversions occur.
Properly configured event and conversion tracking in GTM provides data that informs optimization strategies. This data allows you to understand which campaign elements are driving desired user actions and which require adjustments. Analyzing this information leads to more effective campaigns and a higher return on investment.
Integrating with GA4
Integrating Google Analytics 4 (GA4) with Google Tag Manager (GTM) streamlines data collection and simplifies website tracking. This integration allows you to manage and deploy GA4 tags efficiently without directly modifying website code.
The primary benefit of using GTM for GA4 integration is simplified tag management. Changes to tracking configurations can be made within GTM’s interface, eliminating the need for developer intervention and reducing the risk of implementation errors. This contributes to faster deployment of tracking updates and improved data accuracy.
Key steps in the integration process include creating a GA4 configuration tag within GTM, specifying the measurement ID, and defining the triggers that activate data collection. This allows for granular control over when and how data is sent to GA4.
Testing and Debugging Setup
Thorough testing and debugging are crucial for successful Google Tag Manager (GTM) implementations. A proper setup ensures accurate data collection and prevents costly errors in your digital campaigns.
Preview and Debug Mode
GTM’s built-in Preview and Debug mode is your primary tool. It allows you to see which tags are firing, their triggers, and the data being sent. This real-time feedback is invaluable for identifying and resolving issues before they impact your data.
Tag Assistant
While the Preview Mode is useful, consider using the Tag Assistant (Legacy) extension. This Chrome extension provides a more detailed breakdown of tags on a given page, including potential errors and warnings. Although labelled ‘legacy,’ it remains a helpful debugging tool for many GTM users.
Console Inspection
Leverage your browser’s developer console to inspect network requests. This can reveal problems related to data layer variables, tag sequencing, and other technical aspects. Familiarity with the console is essential for advanced debugging.